I may have mentioned early on in this blog that my plan once the Marlin is finished is to move on to at least one kit guitar, to familiarise myself with different build styles, electrics and the like. Well, a couple of weeks ago I bought the kit for project number 2!
I'd seen the Saga guitar kits on various websites, and read good reviews, and given that they're a reasonable price (about £140-£190) I thought that'd be a good place to start. They do quite a range of guitar and bass kits, all based on classic models, from Strat, Les Paul and Precision bass through to Flying V (very tempting!) and PRS-style. My original plan was to get a Les Paul or PRS-style one, since that's more my kind of guitar than a Fender-style one, but thought perhaps I'd get a Strat one in the future to learn more about building and setting up a guitar with a tremolo (the music anorak in me wants to call it vibrato, but trem is the "received" term for it!).
However, most of the British sites I've seen that list them, show them as "out of stock" or "limited availability" so I was very happy to see the nice people at Firebox (a site I often use for buying gifts) start selling the Strat and Les Paul ones a few months ago. Before too long though, the Les Paul one had disappeared from their site, sold out I assumed. I checked back last month on a whim to see whether it was back, or whether the Strat one had disappeared too, only to find the Strat kit on sale for just £84! My wife convinced me I should get it right away, so I did, and here it is:
Firebox now don't stock either kit, so although I might not get started on it for a while I'm glad I got it when I did. I've not got much idea what to expect for how it'll turn out, but to get everything I need to build a guitar for £84 is great - bar the paint/lacquer, the body comes unfinished. It should make for a fun project and good experience, and if it turns out well I can always use it for further experimentation with different pickups and electrics.
Sunday, 15 April 2012
Tuesday, 10 April 2012
Recess Session
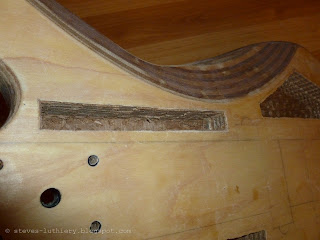
I've now done the basics of the recesses around the cavities - not quite deep enough yet but that will be done very carefully once I've cut the covers, to ensure they fit flush with the surface of the body around them. The work so far was done with a Stanley knife and steel rule to scribe the edges, giving a nice straight line (which mostly worked!) and then careful chipping with a small chisel to remove a couple of millimetres of wood. The plywood is fairly crumbly below the surface veneer and splits easily, so I was even able to do some parts by carefully scraping with the chisel by hand.
General view:
Close-up:
Each one has slightly irregular widths around each side, since they're all quite close to the edges of the body - so the recess is narrower on the side that's closer to the edge, then wider on the other sides where possible to give a larger surface area to glue down the covers.
Monday, 2 April 2012
Dig Your Own Hole(s) (part 3)
Not finding time to work on the Marlin seems to be a recurring theme on this project, but I've finally finished the cavities!
Which leaves me with the finished cavities looking like this:
The last one was a little awkward to chisel out, as it's so narrow, but it just took some patience and regular clearing out of all the shards and chunks. Here's the result:
Which leaves me with the finished cavities looking like this:
The final weight is 2.41kg, which is pretty good - not quite sure how that adds up with the weight after the previous cavity as it's a little less than expected, but that's a good thing so I'm happy with how it's turned out! It's definitely been worth it.
I've already bought a piece of 3mm plywood from which I'll cut the cavity covers, but the next task will obviously be to create the recesses around the cavities that the covers will fit into. Then once the cavities are covered, it's downhill to painting...
Subscribe to:
Comments (Atom)


